No Smoker? Bake Perfect Fall-Off-The-Bone Ribs in Your Oven
Dreaming of succulent, fall-off-the-bone ribs that practically melt in your mouth, but don't own a smoker? You're in luck! Achieving truly tender, lip-smacking barbecue ribs doesn't require specialized equipment or a weekend-long smoking session. With the right technique, your everyday oven can transform a rack of ribs into a culinary masterpiece, delivering all the flavor and tenderness you crave. Forget the complex setups; this
simple bbq ribs recipe is designed for ease, consistency, and absolutely delicious results, making it a favorite for family dinners and casual gatherings alike.
The Secret Weapon: How Your Oven Delivers Unbeatable Tenderness
The magic behind unbelievably tender oven-baked ribs lies in a two-stage cooking process that prioritizes moisture and gentle, consistent heat. While many envision ribs slow-smoked over hickory chips, the truth is, an oven can mimic the low-and-slow environment perfectly, especially when you understand its unique advantages.
The cornerstone of this technique involves baking the ribs, tightly wrapped in foil, at a relatively low temperature for several hours. This creates a steaming environment that breaks down the tough connective tissues in the meat, rendering it incredibly supple. The foil acts like a mini-smoker, trapping all the moisture and flavor, allowing the ribs to essentially braise in their own juices and any seasonings you’ve applied. This initial oven time is where 90% of the tenderness is achieved, ensuring that by the time you're ready to finish them, the meat is already pulling away from the bone.
While some purists might argue that nothing beats a smoker, the oven method offers unparalleled convenience and reliability. There's no constant temperature monitoring, no battling with the elements, and no early morning starts. You simply prep, wrap, and bake, freeing you up to enjoy your day while your ribs slowly transform into a tender delight. The flexibility of this approach means you don't have to wait for a national holiday or perfect weather to enjoy fantastic ribs; they're simple enough for any weeknight or impromptu gathering. To dive deeper into this game-changing method, explore
Simple BBQ Ribs: The Oven-First Secret to Extreme Tenderness.
Decoding the Butcher Counter: Choosing the Best Ribs for Baking
Before you can bake the perfect rack of ribs, you need to start with the right cut. The array of options at the grocery store can be daunting, but for our oven-baked
simple bbq ribs recipe, we're primarily focused on pork ribs. Here’s a quick guide to the most common types and why they work best for this method:
1.
Baby Back Ribs (aka Back Ribs or Loin Ribs): These are taken from the upper rib cage, near the backbone. They are smaller, leaner, and more curved than spare ribs, with the meat primarily on top of the bones. Despite the name, they don't come from baby pigs, but refer to their size relative to spare ribs. Baby backs typically come in 2-3lb racks, feeding 2-3 people. Their smaller size and meat distribution make them ideal for baking, as they cook relatively quickly while still achieving incredible tenderness. They are often the easiest to handle in a standard oven.
2.
Spare Ribs (aka Side Ribs): These come from the belly section of the pig, closer to the breastbone. They are larger, flatter, and contain more bone, cartilage, and fat, with meat distributed both on top and between the bones. Spare ribs generally require a longer cooking time due to their size and fat content but can yield incredibly flavorful results.
*
St. Louis Style Ribs: This is a specific cut of spare ribs where the hard breastbone and cartilage (the "rib tips") have been trimmed off, creating a more uniform, rectangular rack that is easier to manage and cook evenly. If you see these, they are an excellent choice for oven baking.
For beginners and those seeking the quickest path to tender ribs,
baby back ribs are often the best choice due to their consistent size and faster cooking time. Regardless of your choice, look for ribs with good meat coverage, some marbling (fat) for flavor, and a vibrant color.
Essential Prep Tip: Removing the Membrane
A crucial step for truly fall-off-the-bone ribs, regardless of the type you choose, is removing the silverskin membrane from the bone side of the rack. This thin, tough membrane doesn't break down during cooking and can prevent your seasonings from penetrating and your ribs from reaching maximum tenderness. To remove it, simply slide a knife under the membrane at one end of the rack to loosen it, then grip it with a paper towel (for better traction) and pull it firmly away. It should come off in one piece, revealing the clean bone surface underneath.
Mastering the Oven Method: A Step-by-Step Guide
Now that you've selected and prepped your ribs, it's time to bring them to perfection using our simple
simple bbq ribs recipe.
1.
Season Generously: This is where the flavor journey begins. Pat your ribs dry with paper towels. Then, apply a generous amount of your favorite dry rub to both sides of the ribs. Don't be shy! A good dry rub typically contains salt, pepper, garlic powder, onion powder, paprika, brown sugar, and a hint of cayenne for a kick. Massage it into the meat, ensuring every crevice is covered. For maximum flavor penetration, you can do this step several hours or even the night before, allowing the rub to work its magic in the refrigerator.
2.
Preheat and Wrap: Preheat your oven to a low temperature, typically between 250°F (120°C) and 275°F (135°C). This low-and-slow approach is key to tenderness. Tear off several large sheets of heavy-duty aluminum foil. Place the seasoned ribs, bone-side up, onto a large piece of foil. Then, wrap them very tightly, ensuring no steam can escape. You might even double-wrap for extra security. The tighter the seal, the more effectively the ribs will steam.
3.
The Long Bake: Place the foil-wrapped ribs on a baking sheet (to catch any potential leaks) and slide them into the preheated oven.
* For Baby Back Ribs: Bake for approximately 2.5 to 3 hours.
* For Spare Ribs (or St. Louis Style): Bake for 3 to 4 hours.
The exact time will vary based on your oven and the thickness of the ribs. The goal here is tenderness, not color.
4.
The Tenderness Test: After the initial baking time, carefully remove the ribs from the oven. Keeping them wrapped, gently try to bend one end of the rack. If the meat easily gives and shows signs of pulling away from the bone, they are ready for the next stage. If not, rewrap and return to the oven for another 30 minutes, then re-check.
5.
Sauce and Finish: Once tender, carefully unwrap the ribs. Drain any accumulated liquid from the foil (you can reserve this for sauce if you like). Liberally slather both sides of the ribs with your favorite barbecue sauce. For that beautiful caramelized crust, you have a couple of options:
*
Oven Finish: Increase your oven temperature to 375°F (190°C) or switch to the broiler setting (watching very closely!). Bake or broil the sauced ribs for 10-15 minutes, or until the sauce is bubbly and slightly caramelized, turning once if needed.
*
Grill Finish (Optional): If you do have a grill and want that classic char and smoky essence, carefully transfer the sauced ribs to a medium-hot grill. Cook for 5-10 minutes per side, brushing with more sauce, until beautifully charred and sticky.
For more mouth-watering examples and a slightly different take on perfecting this dish, be sure to check out
Easy Oven BBQ Ribs: Fall-Off-The-Bone Tender Every Time.
Beyond the Basics: Tips for Next-Level Oven Ribs
Even with a straightforward recipe, there are always ways to elevate your cooking and truly make this
simple bbq ribs recipe your own.
*
Homemade BBQ Sauce: While store-bought sauces are convenient, a homemade BBQ sauce can truly transform your ribs. Inspired by family traditions, crafting your own allows you to control the sweetness, tang, and spice levels, creating a signature flavor that your family and friends will rave about. Many recipes are surprisingly simple to whip up.
*
Resting is Key: Just like with any cooked meat, allowing your ribs to rest for 10-15 minutes after they come out of the oven or off the grill allows the juices to redistribute throughout the meat, resulting in an even more tender and flavorful experience. Simply tent them loosely with foil.
*
Experiment with Dry Rubs: Don't limit yourself to one blend. Explore different spice combinations – a smoky chipotle rub, a sweet and savory honey-garlic blend, or a spicy Cajun mix. Each will lend a unique character to your ribs.
*
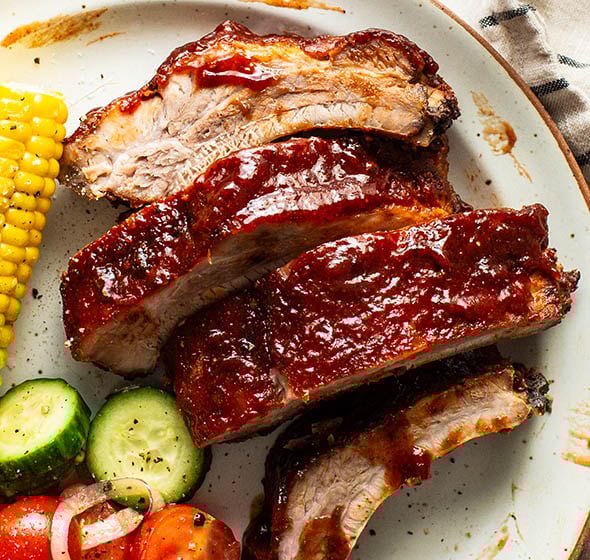
Serving Suggestions: Oven-baked ribs are incredibly versatile. Pair them with classic sides like creamy coleslaw, baked beans, corn on the cob, potato salad, or a fresh green salad. They're perfect for any casual get-together or a satisfying weeknight meal.
Conclusion
You no longer need a smoker or even perfect weather to enjoy incredibly tender, flavor-packed ribs. This
simple bbq ribs recipe harnesses the power of your oven to deliver fall-off-the-bone perfection every single time. By focusing on low and slow baking in foil, followed by a quick finish with your favorite BBQ sauce, you can create a culinary experience that’s both effortless and unforgettable. So go ahead, grab a rack of ribs, fire up your oven, and prepare to impress yourself and your loved ones with the best homemade ribs you’ve ever tasted! Enjoy the ease, embrace the flavor, and make this oven-baked marvel a staple in your kitchen.